Showing posts with label Gardens. Show all posts

Wednesday, October 9, 2013

Teacher Appreciation Garden Cake - June 2013

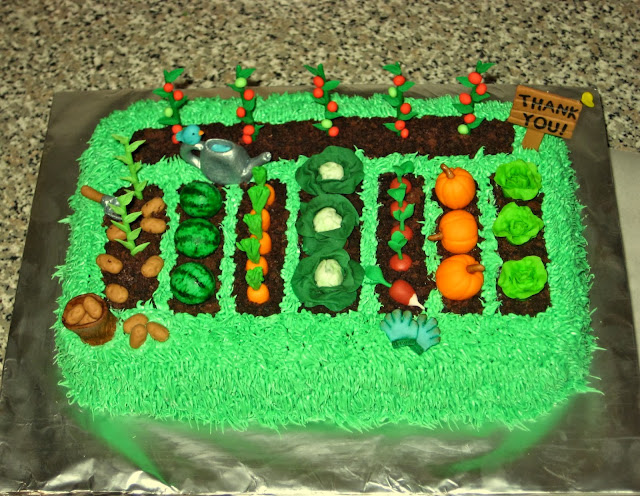
This is a cake that I made for my daughter, Carissa's, 2nd grade teacher as an end of the year thank you.  She loves gardening and even heads up the garden club at the school.  I knew this would be the perfect cake for her.

Teacher Appreciation Garden Cake 1

Teacher Appreciation Garden Cake 2

I first used a dry erase marker to sketch out a 'map' of the garden on the bottom of the glass pan that I would use to bake the cake.  I did this so I could get an idea of scale when I started making the fondant fruits and vegetables.  This really helped with keeping the sizes and spacing right as I went.

All the fruits, vegetables, and other items on the cake are made out of fondant.  Some of the details are done with edible food markers and some are done with food coloring.  I painted the watering can and trowel with silver airbrush food coloring. The fondant items were made before baking the cake so that they would have time to dry, especially things I needed to stay standing up.
 
Teacher Appreciation Garden Cake - Angled View

Teacher Appreciation Garden Cake - Back Angled View
 
For the actual cake I baked it in a 7x11 inch pan.  You could use whatever size suits your design.  After the cake was baked and completely cool I leveled the top.  I drew a quick outline of my garden rows on top of the cake with an edible food marker.  Then, I filled in the rows with some brown icing.  I used some of the cake that I leveled off the top for the dirt in the rows.  To do this I just crumbled the cake to the fineness that I wanted and sprinkled it on the icing.  I tinted some buttercream icing green and using a grass tip piped the grass everywhere left on the cake that wasn't covered in dirt (cake crumb dirt that is :) ).

After that all that was left to do was place the fondant pieces on the cake.  Yay, a finished garden cake!  Or so I thought... unfortunately how I chose to store the cake overnight caused the fondant to weaken where it was place in the cake and when I woke up my tomato plants, potato plants, and sign were all drooped over at the base.  :(  For the potato plants I was able to use the top that was above the cake still and they were just a bit shorter.  I repaired the bottom of the tomato plants and reinforced/stabilized them with toothpicks.  Oh well, now they just looked like someone had put a stake there for the tomato plant to grow on.  :)  To fix the sign I covered a toothpick in fondant and attached it to the back of the sign and post and stuck it into the cake.  I wish I could have made the repair look prettier, but it had to be a quick fix to get the kids and cake to school.  :)
 
Teacher Appreciation Garden Cake 3

Teacher Appreciation Garden Cake 4

I was so happy with how the cake came out; I thought all the little fondant pieces turned out really cute!  And... Carissa's teacher thought so too.  :)  She absolutely loved the cake!  Hooray!  :)
Andrea - Animated Name
(I created my animated name at this site.)

Monday, September 10, 2012

Teacher Appreciation Tulip Cupcakes - May 2012

I made these tulip cupcakes for my son, Caleb's, 4th grade homeroom teacher.  On a list of her favorites she wrote tulip down for one of her favorite flowers, so we thought that would be cute.  Caleb helped pick what colors to make the tulips.

Teacher Appreciation Tulip Cupcakes 1

Teacher Appreciation Tulip Cupcakes - Overhead View

Teacher Appreciation Tulip Cupcakes - Purple Tulip

Teacher Appreciation Tulip Cupcakes - Yellow Tulip

Teacher Appreciation Tulip Cupcakes - PinkTulip

Teacher Appreciation Tulip Cupcakes - Close-Up of Tulips

Teacher Appreciation Tulip Cupcakes 2

The cupcakes are just chocolate cupcakes baked, cooled completely, then iced using a medium-sized open star tip to pipe a large swirl to cover the top of the cupcake. 

To make the tulips, I bought some long lollipop sticks and cut them in half.  I painted them green with some watered down food coloring and set them aside to dry.  Next, I tinted some fondant green to match the color of the sticks.  I rolled out the green fondant and cut out shapes similar to tulip leaves.  I used some fondant tools to thin and elongate the leaves in the necessary places.  Then I lay the leaves on top of some of the extra lollipop sticks to let them dry with a little curve to them.

I tinted some fondant pink and rolled a piece into a ball.  I inserted one of the green lollipop sticks into the ball to serve as a base for the tulip petals.  I rolled out the rest of the pink fondant and used a large petal cutter from a set I have to cut out 5 petals.  Using some fondant tools I thinned and rounded out the petals where needed.  Then I used some water to attach the petals around the ball base.  I smoothed and furled my petals here and there to get the look that I wanted for the tulip.

Next, I inserted the tulip into the cupcake and then placed two of my leaves into the icing on either side of the stick.  Then I repeated the steps for the purple and yellow tulips using their respective colors of fondant.

I was happy with the way these cupcakes turned out.  I thought they looked sweet, bright, and Spring-y.  :)  Caleb's teacher really liked them too!  :)
Andrea - Animated Name


(I created my animated name at this site.)

LinkWithin

Related Posts Plugin for WordPress, Blogger...