Showing posts with label 3D. Show all posts

Saturday, February 18, 2017

Most Everyone's Mad Here... About Cake! - March 2015

I made these Alice in Wonderland themed teacup cakes and this Cheshire Cat teapot cake for my sister Casandra for her birthday.  She was having a Mad Hatter Tea Party for her birthday party and had requested these for her cake.  She had seen a Cheshire Cat teapot pin and thought it would make a cute cake.  She also asked for some teacup cakes decorated however I thought would be cute, and these are what I came up with.

Alice in Wonderland Themed Teacup Cupcakes & Cheshire Cat Teapot Cake 1

Alice in Wonderland Themed Teacup Cupcakes & Cheshire Cat Teapot Cake 2

More pictures and details to come... 😊
Andrea - Animated Name


(I created my animated name at this site.)

Thursday, January 21, 2016

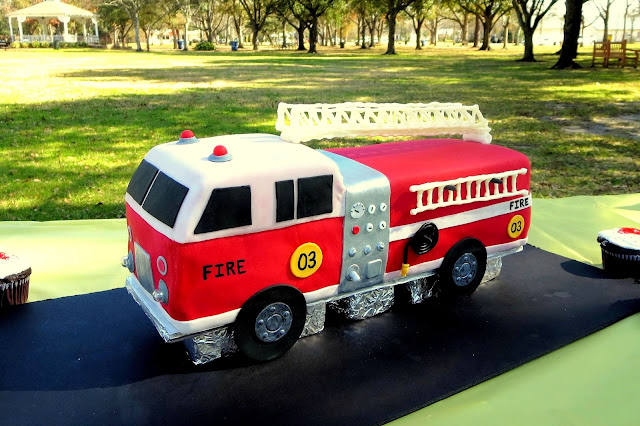
Fire Truck Cake - January 2014

I made this fire truck cake for my nephew Gavin's 3rd birthday.  The headlights and two lights on top the fire truck really lit up and flashed.  :)

3D Fire Truck Cake 1

3D Fire Truck Cake - Close Up - Lights On

3D Fire Truck Cake - Side View

3D Fire Truck Cake - Front Angle View

3D Fire Truck Cake - Back Angle View

3D Fire Truck Cake 2

More pictures and details coming soon... :)

[Right now I'm just trying to get everything on the blog, then I'll go back and fill in details; you can read a little longer explanation here if you want. BUT if you have any questions in the meantime, in general or about this cake, please feel free to email me by clicking on the 'Contact Me' tab at the top of the page and using the email address found there, and I will try to get back with you as soon as possible. Or you can always ask questions or leave a comment about this cake by clicking the comments link at the end of this post. :)]
Andrea - Animated Name

(I created my animated name at this site.)

Tuesday, May 27, 2014

Switchfoot Themed Cake Balls - October 2013

These are cake balls I made for the band members of Switchfoot and their crew as part of the Switchfoot Baking Club.  I decorated them with various 'Switchfoot themed' items, and brought them to their Fading West movie viewing and concert back in October. 

Switchfoot Themed Cake Balls
 
[The little picture of the guitar to the side is a correction on one of the guitars that I had made that I delivered at a later date.  I got it wrong and it bugged me. ;) ]

More pictures and details to come... :)

[Right now I'm just trying to get everything on the blog, then I'll go back and fill in details; you can read a little longer explanation here if you want. BUT if you have any questions in the meantime, in general or about this cake, please feel free to email me by clicking on the 'Contact Me' tab at the top of the page and using the email address found there, and I will try to get back with you as soon as possible. Or you can always ask questions or leave a comment about this cake by clicking the comments link at the end of this post. :)]
Andrea - Animated Name(I created my animated name at this site.)

Monday, January 13, 2014

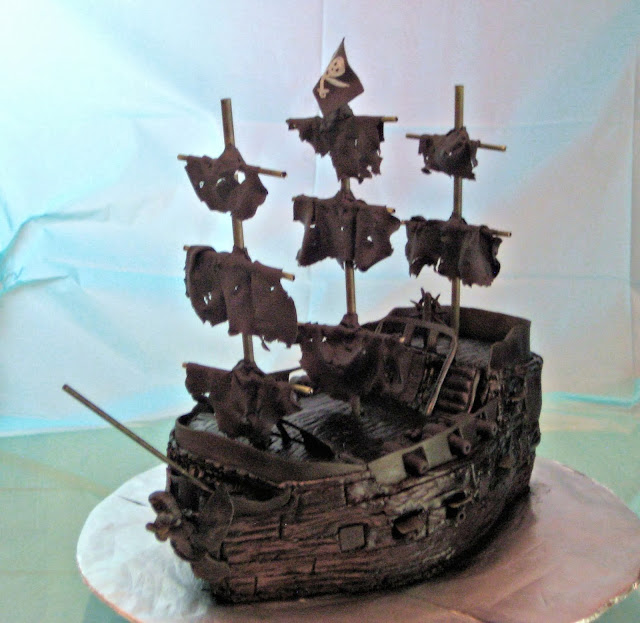
The Black Pearl Pirate Ship Cake - July 2013

I made this pirate ship cake of The Black Pearl from Pirates of the Caribbean for my daughter Cara for her 14th birthday.

Pirate Ship Cake of The Black Pearl from Pirates of the Caribbean - Front Angle View 1

Pirate Ship Cake of The Black Pearl from Pirates of the Caribbean - Back Angle View

For this cake I used two 9" x 13" cakes.  I stacked one on the other and carved the basic body of the ship.  I used pieces that I cut off to build up other parts of the ship.  I crumb coated the body of the ship and then iced it with chocolate icing.

Pirate Ship Cake of The Black Pearl from Pirates of the Caribbean - Close-Up of Fondant Figurehead

Pirate Ship Cake of The Black Pearl from Pirates of the Caribbean - Close-Up of Fondant Ship's Wheel

Pirate Ship Cake of The Black Pearl from Pirates of the Caribbean - Side View 1

I put all the railings, stairs, cannon doors, and the figurehead, which were all made from white fondant, on the cake next.  I used a paring knife to make the lines in the icing to look like the wooden planks of the ship.  The vertical masts are wooden dowels cut to size, and for the diagonal mast above the figure head I used a long white lollipop stick.

Pirate Ship Cake of The Black Pearl from Pirates of the Caribbean - Front Angle View 2

Pirate Ship Cake of The Black Pearl from Pirates of the Caribbean - Close-Up of Deck and Fondant Cannons and Cannonballs

Pirate Ship Cake of The Black Pearl from Pirates of the Caribbean - Close-Up of Fondant Pirate Flag

I airbrushed the cake and everything on it at this point with black food coloring.  Then I placed the cannons, cannon balls, and steering wheel on the cake.  These were made from black fondant.

Pirate Ship Cake of The Black Pearl from Pirates of the Caribbean - Back View

Pirate Ship Cake of The Black Pearl from Pirates of the Caribbean - Front Angle View 3

I used some thin wire and fondant to attach some white lollipop sticks to the wooden masts.  I made the sails from black fondant that I rolled very thin.  I tore and stretched the fondant sails to make them look ragged and old.  I draped the fondant sails on the masts and pulled some pieces off them to put some finishing ragged touches on them.  I airbrushed (or painted, I can't remember) the exposed parts of the lollipop sticks that the sails were draped on.

Pirate Ship Cake of The Black Pearl from Pirates of the Caribbean - Close-Up of Fondant Sails

Pirate Ship Cake of The Black Pearl from Pirates of the Caribbean - Side View 2

The pirate flag was made from black fondant.  I painted the skull and swords on it with white food coloring; then I attached it to the mast.

Pirate Ship Cake of The Black Pearl from Pirates of the Caribbean - Front Angle View 4

Although I didn't get everything on the cake that I would've liked (ropes, windows, lamps, etc.) I was really happy with the way the cake turned out.  Cara loved it, yay!  :)
Andrea - Animated Name


(I created my animated name at this site.)

Sunday, December 29, 2013

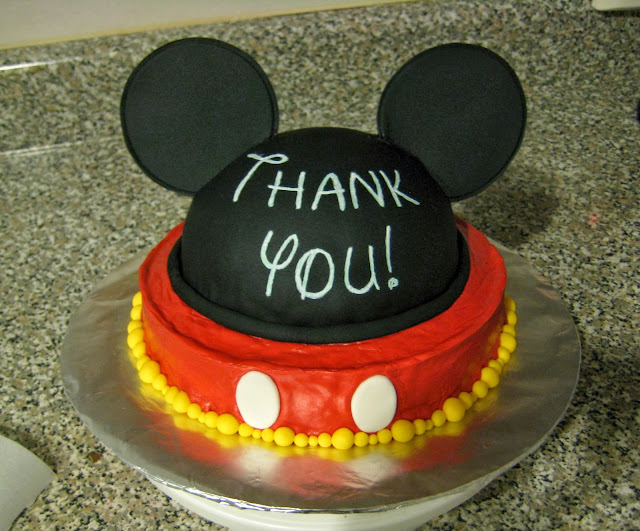
Mickey Mouse Ears Teacher Appreciation Cake - June 2013

I made this Mickey Mouse themed cake for my son, Caleb's, 5th grade teacher.  Our family had taken a trip to Disney World during the year and his teacher had shared with us how much she loved Disney World.  Later she told us that after she found out we were going she talked to her husband and they were going to go on a trip to Disney World in the summer.  :)  So, I thought this would be a special cake for her from us.  [She LOVED the cake!  :) ]

Mickey Mouse Ears Teacher Appreciation Cake 1

Mickey Mouse Ears Teacher Appreciation Cake - Angled View

Mickey Mouse Ears Teacher Appreciation Cake - Overhead View

Mickey Mouse Ears Teacher Appreciation Cake - Close-Up View

Mickey Mouse Ears Teacher Appreciation Cake 2
 
This is a picture of how the cake looked before the words were on it.
Mickey Mouse Ears Teacher Appreciation Cake - No Words View

At first I put a tail on the back of the cake, but ultimately I decided to not use it.  I didn't end up liking the way it looked from the front with the tail.  These two pictures are of different views when the tail was still on the cake.
Mickey Mouse Ears Teacher Appreciation Cake - Tail Attached Back View

Mickey Mouse Ears Teacher Appreciation Cake - Tail Attached Angled View
More details to come... :)
 
[Right now I'm just trying to get everything on the blog, then I'll go back and fill in details; you can read a little longer explanation here if you want. BUT if you have any questions in the meantime, in general or about this cake, please feel free to email me by clicking on the 'Contact Me' tab at the top of the page and using the email address found there, and I will try to get back with you as soon as possible. Or you can always ask questions or leave a comment about this cake by clicking the comments link at the end of this post. :)]
Andrea - Animated Name


(I created my animated name at this site.) 

Friday, June 21, 2013

Easter Deviled Egg Chicks - March 2013

Okay, so these are not cake, but I thought these little deviled egg chicks were cute, so I decided to share them.  :)

Easter Deviled Egg Chicks - Close-Up of Chick 1

Easter Deviled Egg Chicks 1

Easter Deviled Egg Chicks 2

Easter Deviled Egg Chicks - Close-Up of Chick 2
 
Easter Deviled Egg Chicks - Close-Up of Chick 3

Easter Deviled Egg Chicks 3

Easter Deviled Egg Chicks - Close-Up of Chick 5Easter Deviled Egg Chicks - Close-Up of Chick 4

Easter Deviled Egg Chicks - Close-Up of Chick 6

Easter Deviled Egg Chicks 4

While not looking specifically for them, I first came across these on Pinterest.  The links I clicked and ended up making them from brought me to a site called Alison Artisan (tutorial with pictures here) and a site called A Thrifty Mom (tutorial with pictures here).  I honestly don't remember which I saw first, but I pulled ideas and tips from both.
 
I thought these were so cute, and once I saw them (a couple months before Easter) I couldn't wait for Easter to come so I could make them.  I didn't follow the actual recipe for the deviled egg mixture on either site, I  just used my usual deviled egg recipe.  The eyes are pieces of black olive and the beaks are carrot pieces.  I followed the instructions in the links above for making them into little chicks.
 
I thought these turned out cute, and they were a big hit when we got together with my family for Easter.  They were almost too cute to eat.  :)
Andrea - Animated Name


(I created my animated name at this site.)

Wednesday, March 21, 2012

Utini!... a Jawa Cake - November 2011

I made this Jawa cake for my daughter, Carissa, for her 7th birthday.

Star Wars 3D Jawa Cake with Glowing Eyes 1

Star Wars 3D Jawa Cake with Glowing Eyes - Side View

Star Wars 3D Jawa Cake with Glowing Eyes - Angled Back View

Star Wars 3D Jawa Cake with Glowing Eyes 2

Star Wars 3D Jawa Cake with Glowing Eyes - Back View

Star Wars 3D Jawa Cake with Glowing Eyes - In the Dark to Show Glowing Eyes Better

Star Wars 3D Jawa Cake with Glowing Eyes 3
More details and pictures to come... :)

[Right now I'm just trying to get everything on the blog, then I'll go back and fill in details; you can read a little longer explanation here if you want. BUT if you have any questions in the meantime, in general or about this cake, please feel free to email me by clicking on the 'Contact Me' tab at the top of the page and using the email address found there, and I will try to get back with you as soon as possible. Or you can always ask questions or leave a comment about this cake by clicking the comments link at the end of this post.  :)]
Andrea - Animated Name


(I created my animated name at this site.)

LinkWithin

Related Posts Plugin for WordPress, Blogger...