Showing posts with label Birds. Show all posts

Tuesday, March 7, 2017

Owl Teacher Appreciation Cake - June 2015

This cake was one that I made for my daughter Carissa's GT teacher at school.  We thought that it would be cute to put owls on the cake.  Soon after I started drawing it we found out that she liked ladybugs; so I added a couple in the picture. 🐞😉 

Owls & Ladybugs Teacher Appreciation Cake 1

Owls & Ladybugs Teacher Appreciation Cake - Overhead View 1

Owls & Ladybugs Teacher Appreciation Cake - Close Up of Blue Owl

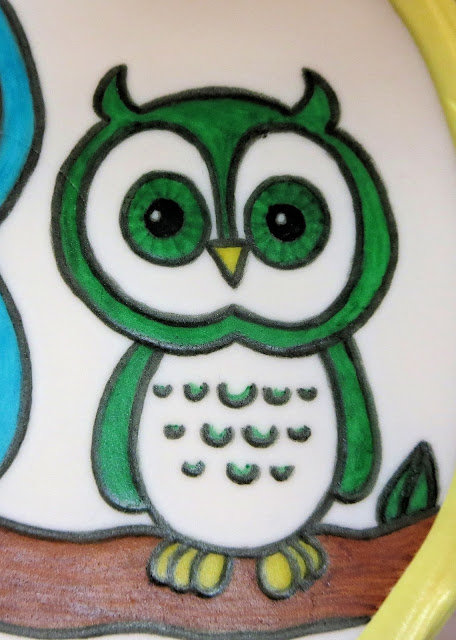
Owls & Ladybugs Teacher Appreciation Cake - Close Up of Green Owl

Owls & Ladybugs Teacher Appreciation Cake - Close Up of Ladybugs

Owls & Ladybugs Teacher Appreciation Cake 2

Owls & Ladybugs Teacher Appreciation Cake - Overhead View 2

Owls & Ladybugs Teacher Appreciation Cake - Angled View

More details to come... 😊
Andrea - Animated Name


(I created my animated name at this site.)

Sunday, January 22, 2017

Smile and Say... "CAKE" - November 2014

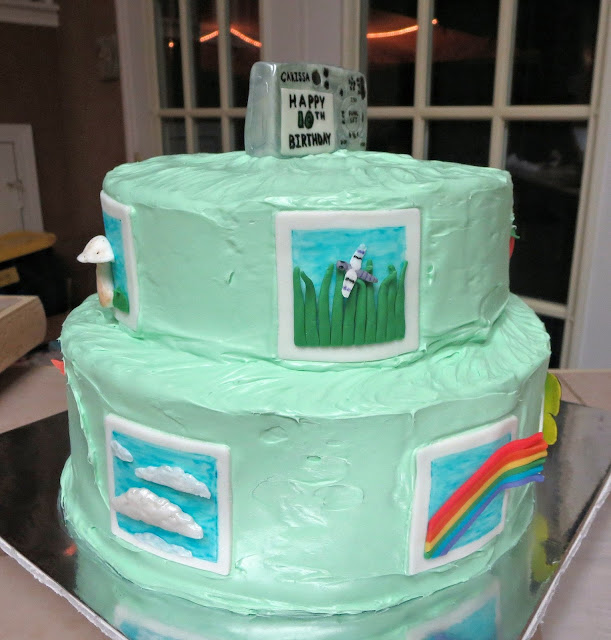
I made this photography themed cake for my daughter Carissa for her 10th birthday.  You can go to this post if you want to to see some camera sugar cookies I made for goodie bag favors.

Camera Photography Themed Cake - Front View

Camera Photography Themed Cake - Back Angled View 1

Camera Photography Themed Cake - Back Angled View 2

More pictures and details coming soon... :)


(I created my animated name at this site.)

Wednesday, October 9, 2013

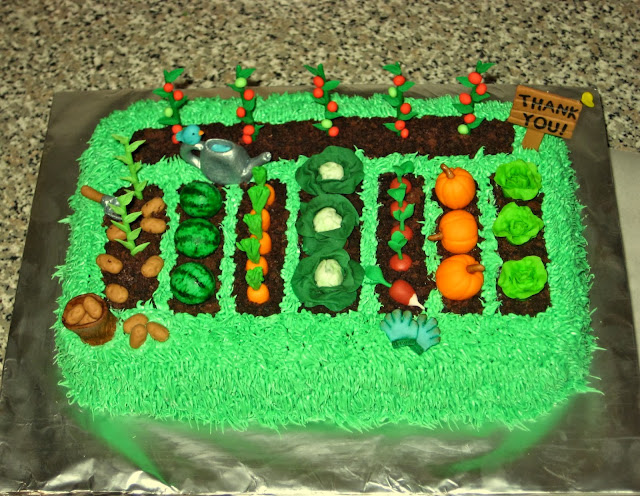
Teacher Appreciation Garden Cake - June 2013

This is a cake that I made for my daughter, Carissa's, 2nd grade teacher as an end of the year thank you.  She loves gardening and even heads up the garden club at the school.  I knew this would be the perfect cake for her.

Teacher Appreciation Garden Cake 1

Teacher Appreciation Garden Cake 2

I first used a dry erase marker to sketch out a 'map' of the garden on the bottom of the glass pan that I would use to bake the cake.  I did this so I could get an idea of scale when I started making the fondant fruits and vegetables.  This really helped with keeping the sizes and spacing right as I went.

All the fruits, vegetables, and other items on the cake are made out of fondant.  Some of the details are done with edible food markers and some are done with food coloring.  I painted the watering can and trowel with silver airbrush food coloring. The fondant items were made before baking the cake so that they would have time to dry, especially things I needed to stay standing up.
 
Teacher Appreciation Garden Cake - Angled View

Teacher Appreciation Garden Cake - Back Angled View
 
For the actual cake I baked it in a 7x11 inch pan.  You could use whatever size suits your design.  After the cake was baked and completely cool I leveled the top.  I drew a quick outline of my garden rows on top of the cake with an edible food marker.  Then, I filled in the rows with some brown icing.  I used some of the cake that I leveled off the top for the dirt in the rows.  To do this I just crumbled the cake to the fineness that I wanted and sprinkled it on the icing.  I tinted some buttercream icing green and using a grass tip piped the grass everywhere left on the cake that wasn't covered in dirt (cake crumb dirt that is :) ).

After that all that was left to do was place the fondant pieces on the cake.  Yay, a finished garden cake!  Or so I thought... unfortunately how I chose to store the cake overnight caused the fondant to weaken where it was place in the cake and when I woke up my tomato plants, potato plants, and sign were all drooped over at the base.  :(  For the potato plants I was able to use the top that was above the cake still and they were just a bit shorter.  I repaired the bottom of the tomato plants and reinforced/stabilized them with toothpicks.  Oh well, now they just looked like someone had put a stake there for the tomato plant to grow on.  :)  To fix the sign I covered a toothpick in fondant and attached it to the back of the sign and post and stuck it into the cake.  I wish I could have made the repair look prettier, but it had to be a quick fix to get the kids and cake to school.  :)
 
Teacher Appreciation Garden Cake 3

Teacher Appreciation Garden Cake 4

I was so happy with how the cake came out; I thought all the little fondant pieces turned out really cute!  And... Carissa's teacher thought so too.  :)  She absolutely loved the cake!  Hooray!  :)
Andrea - Animated Name
(I created my animated name at this site.)

Tuesday, July 16, 2013

Easter Chick Cupcakes - March 2013

I made these cute little chick cupcakes for our Easter celebration with my family.  I saw them on a great site called Bird on a Cake last year and couldn't wait to make them.

Easter Chick Cupcakes - Close-Up Angled View

Easter Chick Cupcakes 1

Easter Chick Cupcakes - Close-Up View 1

Easter Chick Cupcakes - Close-Up View 2

Easter Chick Cupcakes 2

Easter Chick Cupcakes 3

Easter Chick Cupcakes - Close-Up Group

Easter Chick Cupcakes - Angled View

Easter Chick Cupcakes - Close-Up View 3

Easter Chick Cupcakes 4

To make these chicky cupcakes I followed a tutorial (with pictures) that Robin from Bird on a Cake has made.  The only thing I changed for my cupcakes was the tip that I used to make the wings.  I used a #3 round tip to pipe the wings on.  It's just how I decided to do it at the time, but I think I like the shape and height the wings that the original cupcakes have; so I think I would use the tip she did if I were to make them again (or make more layers with the #3 tip).
 
My family and I thought these were so adorable.  We also liked the little bit of crunch the sanding sugar give the cupcakes when you bite into them.  Cute, cute, cute!  :)
 
(Also, check out the deviled egg chicks that I made for Easter as well.)
Andrea - Animated Name


(I created my animated name at this site.)

Friday, June 21, 2013

Easter Deviled Egg Chicks - March 2013

Okay, so these are not cake, but I thought these little deviled egg chicks were cute, so I decided to share them.  :)

Easter Deviled Egg Chicks - Close-Up of Chick 1

Easter Deviled Egg Chicks 1

Easter Deviled Egg Chicks 2

Easter Deviled Egg Chicks - Close-Up of Chick 2
 
Easter Deviled Egg Chicks - Close-Up of Chick 3

Easter Deviled Egg Chicks 3

Easter Deviled Egg Chicks - Close-Up of Chick 5Easter Deviled Egg Chicks - Close-Up of Chick 4

Easter Deviled Egg Chicks - Close-Up of Chick 6

Easter Deviled Egg Chicks 4

While not looking specifically for them, I first came across these on Pinterest.  The links I clicked and ended up making them from brought me to a site called Alison Artisan (tutorial with pictures here) and a site called A Thrifty Mom (tutorial with pictures here).  I honestly don't remember which I saw first, but I pulled ideas and tips from both.
 
I thought these were so cute, and once I saw them (a couple months before Easter) I couldn't wait for Easter to come so I could make them.  I didn't follow the actual recipe for the deviled egg mixture on either site, I  just used my usual deviled egg recipe.  The eyes are pieces of black olive and the beaks are carrot pieces.  I followed the instructions in the links above for making them into little chicks.
 
I thought these turned out cute, and they were a big hit when we got together with my family for Easter.  They were almost too cute to eat.  :)
Andrea - Animated Name


(I created my animated name at this site.)

Thursday, May 9, 2013

Pigeon Cake Pops and Light Blue Cake Balls - November 2012

So, after I made Carissa's Mo Willems themed birthday cake and her Pigeon Cupcakes to celebrate her birthday at school, I decided to use the leftover cake to make Pigeon Cake Pops and some Cake Balls for us to enjoy at home.  [I'd made cake balls before, but this was the first time I'd made cake pops, definitely a bit tricky.  These were just for fun, and good thing because some of them came out pretty funny looking, a couple aren't even pictured here.  :) ]

Mo Willems' The Pigeon Cake Pop 1

Mo Willems' The Pigeon Cake Pop 2

Mo Willems' The Pigeon Cake Pop 3

Mo Willems' The Pigeon Cake Pop 3 - Opposite Side

Mo Willems' The Pigeon Cake Pop 4

Mo Willems' The Pigeon Cake Pop 4 - Opposite Side

Mo Willems' The Pigeon Cake Pop 5

Mo Willems' The Pigeon Cake Pops
To make these Pigeon Cake Pops I started with the recipe found on Bakerella's website for cake pops (using light blue candy melts for my coating).
 
After the step where you dip the cake pop into the candy melts to coat it, I inserted yellow candy coated sunflower seeds into the candy coating to be the beaks.  (For the bottom half of the beak, I cut a little of the end off the sunflower seed, so it would be a little shorter than the top one.)  You have to insert the beaks quickly before the candy coating hardens.  On the cake pops with the smaller candy eyeballs (made by Wilton) I also had to put the eyes on each side before the coating hardened.  So, make sure you have everything set out and ready for each cake pop, so you can grab it and put it on quickly after you dip the cake pop.
 
For the cake pops with the larger flatter eyes I waited until the candy coating was hardened (still put your beaks on before the coating sets), and then I piped on the eyes with some white candy melts.  To get the white candy melts ready to pipe on, I heated them per the instructions on the package and put some in a piping bag with a round tip (I think it was a #3).  After the eyes hardened I used black food coloring to paint the pupils on the eyes.  On the last cake pop pictured with this type of eye, I just used one sunflower seed to make the beak.  I used a black food marker to make the line on that beak.
 
The kids enjoyed seeing the finished product.  They enjoyed eating the finished product even more, and even the funny ones still tasted good!  :)
  
 
I only ended up making about 7 Pigeon cake pops, so below are the cake balls that I made as well.
 
Light Blue Cake Balls with Sprinkles - Close Up 1

Light Blue Cake Balls with Sprinkles 1

Light Blue Cake Balls with Sprinkles - Close Up 2

Light Blue Cake Balls with Sprinkles - Close Up 3

Light Blue Cake Balls with Sprinkles 2

Light Blue Cake Balls with Sprinkles - Close Up 4
To make these cake balls, I just used the recipe found on Bakerella's website for cake balls.  These were chocolate cake mixed with vanilla icing, and I used light blue candy melts for the coating, topping them with white crystal sugar sprinkles before the candy coating hardened.

Yummy!  :)

(I created my animated name at this site.)

LinkWithin

Related Posts Plugin for WordPress, Blogger...