Showing posts with label Grass tip. Show all posts

Friday, January 3, 2014

Golf Themed Cake (with a Surprise Inside) - June 2013

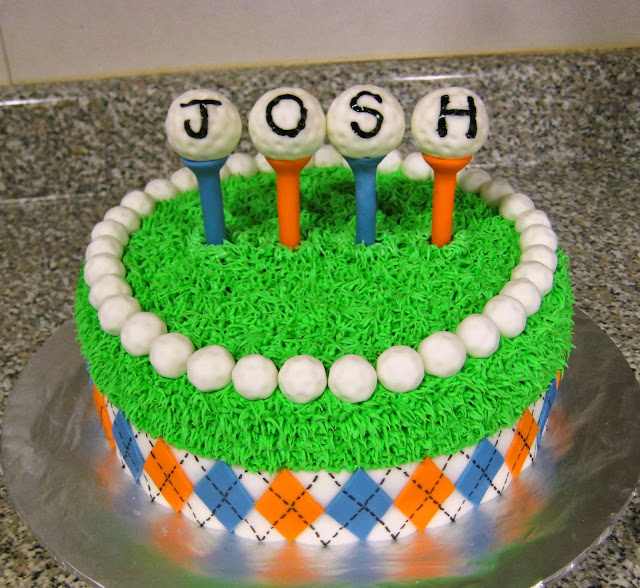
I made this golf themed cake for my brother-in-law, Josh, for his birthday.

Golf Themed Cake 1

And, SURPRISE, the cake was PLAID inside!  :)
Golf Themed Cake with Plaid Cake Inside

Golf Themed Cake - Close-Up View of Mini Golf Balls, Grass, and Argyle

For this cake I used a new recipe that is so good!  I had heard about it a long time ago, but had never tried it.  It is a white almond sour cream cake.  Here is a link to the recipe that I used, and here is a link to the same person's recipe, just written a little differently.  I highly recommend trying this recipe out.

Golf Themed Cake - Bowls with Different Colored Batter Separated for Plaid CakeSo, this is how I made the inside of the cake plaid.  After mixing my cake batter I separated it about in half and then took out a small portion from one of the bowls.  (Sorry, I don't have exact measurements that I used.)  In the bowl with the majority of the batter I added blue food coloring to make a light blue shade.  In the bowl with the small portion of batter I added blue food coloring to make a darker shade of blue.  I left the last bowl of batter white.  When pouring the batter into the pans I used my checkerboard cake pan set.  In two of the pans I poured the white batter in the center circle and the outer rings.  Then in the same pans I poured the light blue batter in the middle rings.  In the third pan I poured the light blue batter in the center circle and the outer ring, and then poured the dark blue batter in the middle ring of that pan.  This is how the batter looked in the pans ready to go into the oven.
Golf Themed Cake - Cake Pans with Batter Pattern for Plaid CakeAfter baking I flipped the cakes out of their pans after 15 minutes and let them finish cooling completely.  Then I leveled the tops of the cakes.
When stacking the cakes I put one of the white cakes on the bottom, the all blue cake next for the middle layer, and the other white cake went on top.  I used orange buttercream icing in between each cake layer.  (My brother-in-law is a Broncos fan, so I figured I'd incorporate those colors into his golf cake. :) )  Later when you cut into the cake you have plaid inside!  :)

Golf Themed Cake - Close-Up View of Plaid Cake Inside

Golf Themed Cake 2

I put a 1-1/2 inch strip of white fondant around the bottom of the cake.  Then I used a grass tip to cover the rest of the cake with green buttercream icing.  I made a diamond template that was 1 inch in diameter and about 1-1/2 inches tall.  I rolled out blue and orange fondant and cut out enough diamonds to go around the cake.  I attached the diamonds to the white strip at the bottom of the cake, and then drew on the dotted black diamonds with a black food coloring marker.  I made mini golf balls and placed them around the top edge of the cake. 

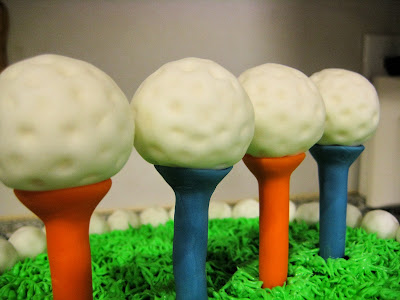
Golf Themed Cake - Close-Up View of Golf Tees and Golf Balls

The golf tees are lollipop sticks covered in fondant and shaped to look like a tee.  Originally I was going to make cake balls for the golf balls on top of the tees, but my golf ball candy mold was still packed from moving, and I didn't have time to find it.  So, I just made them out of fondant and painted the letters on with black food coloring.  I may have used my black food coloring marker for the letters, I don't remember now which it was.  :)  I stuck the golf tees into the cake and attached the golf balls to the tops of the tees.

Golf Themed Cake 3

Golf Themed Cake - Plaid Cake Inside and Slice of Cake
I really liked the look of this cake, and I was excited about the plaid inside!  :)  And everyone loved the new recipe that I used for the cake.  It was delicious.  :)

Afterwards I used the cake scraps that were leftover from leveling the cakes to make some cake balls.
Dark Brown and Light Brown Cake BallsChocolate Cake Balls with Blue Cake Inside
Andrea - Animated Name
(Created animated name at this site.)

Wednesday, October 9, 2013

Teacher Appreciation Garden Cake - June 2013

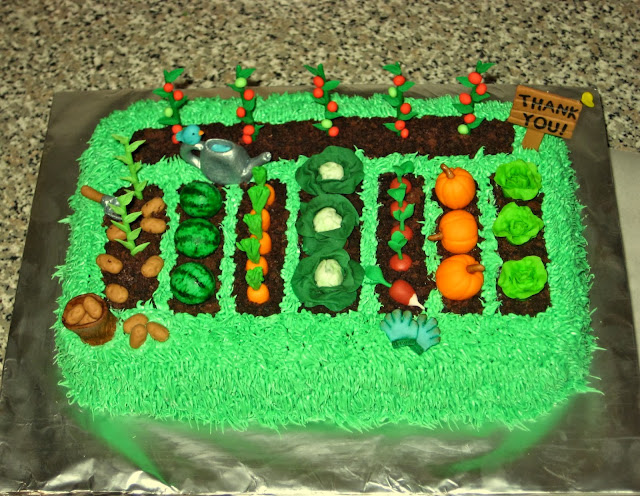
This is a cake that I made for my daughter, Carissa's, 2nd grade teacher as an end of the year thank you.  She loves gardening and even heads up the garden club at the school.  I knew this would be the perfect cake for her.

Teacher Appreciation Garden Cake 1

Teacher Appreciation Garden Cake 2

I first used a dry erase marker to sketch out a 'map' of the garden on the bottom of the glass pan that I would use to bake the cake.  I did this so I could get an idea of scale when I started making the fondant fruits and vegetables.  This really helped with keeping the sizes and spacing right as I went.

All the fruits, vegetables, and other items on the cake are made out of fondant.  Some of the details are done with edible food markers and some are done with food coloring.  I painted the watering can and trowel with silver airbrush food coloring. The fondant items were made before baking the cake so that they would have time to dry, especially things I needed to stay standing up.
 
Teacher Appreciation Garden Cake - Angled View

Teacher Appreciation Garden Cake - Back Angled View
 
For the actual cake I baked it in a 7x11 inch pan.  You could use whatever size suits your design.  After the cake was baked and completely cool I leveled the top.  I drew a quick outline of my garden rows on top of the cake with an edible food marker.  Then, I filled in the rows with some brown icing.  I used some of the cake that I leveled off the top for the dirt in the rows.  To do this I just crumbled the cake to the fineness that I wanted and sprinkled it on the icing.  I tinted some buttercream icing green and using a grass tip piped the grass everywhere left on the cake that wasn't covered in dirt (cake crumb dirt that is :) ).

After that all that was left to do was place the fondant pieces on the cake.  Yay, a finished garden cake!  Or so I thought... unfortunately how I chose to store the cake overnight caused the fondant to weaken where it was place in the cake and when I woke up my tomato plants, potato plants, and sign were all drooped over at the base.  :(  For the potato plants I was able to use the top that was above the cake still and they were just a bit shorter.  I repaired the bottom of the tomato plants and reinforced/stabilized them with toothpicks.  Oh well, now they just looked like someone had put a stake there for the tomato plant to grow on.  :)  To fix the sign I covered a toothpick in fondant and attached it to the back of the sign and post and stuck it into the cake.  I wish I could have made the repair look prettier, but it had to be a quick fix to get the kids and cake to school.  :)
 
Teacher Appreciation Garden Cake 3

Teacher Appreciation Garden Cake 4

I was so happy with how the cake came out; I thought all the little fondant pieces turned out really cute!  And... Carissa's teacher thought so too.  :)  She absolutely loved the cake!  Hooray!  :)
Andrea - Animated Name
(I created my animated name at this site.)

Saturday, January 12, 2013

Golf Themed Cheesecake Brownie Cupcakes - June 2012

I made these golf themed cheesecake brownie cupcakes for my brother-in-law, Josh, for his birthday.  This was made for the same party that I made my sister's high heel cupcakes for (see this post).

Golf Themed Cheesecake Brownie Cupcakes 1
 
Golf Themed Cheesecake Brownie Cupcakes 2
 
Golf Themed Cheesecake Brownie Cupcakes - Close Up View 1
 
Golf Themed Cheesecake Brownie Cupcakes - Close Up View 2
 
Golf Themed Cheesecake Brownie Cupcakes - Close Up View of Flag and Golf Ball 1
 
Golf Themed Cheesecake Brownie Cupcakes - Close Up View 3
 
Golf Themed Cheesecake Brownie Cupcakes - Close Up View of Golf Club and Golf Ball
 
Golf Themed Cheesecake Brownie Cupcakes - Close Up View of Flag and Golf Ball 2
These brownie cupcakes were from the same batch that I used for Carissa's teacher's triathlon themed cupcakes a couple days earlier (see this post).  My mom mixed the cheesecake topping up for me and added some green food coloring to tint it.  It was just an instant cheesecake mix.  I put the cheesecake mixture in a piping bag and used a grass tip to pipe the grass on top of the brownie cupcakes.

I made some golf themed accessories out of fondant to go on the cupcakes.  The golf balls were just a small ball of fondant that I dotted with gray food coloring, I think I used a toothpick with a little of the tip broken off (takes longer than you think it would :) ).  I applied a little pressure when dotting the food coloring on to make slight dimples in the ball.  To make the flags I rolled out some yellow, red, and white fondant and cut out the rectangles.  Then I attached the fondant flags to a toothpick.  I let the flags dry upright so the flag would drape down some and look a little more natural.  The golf clubs were made by painting a toothpick with gray food coloring, attaching some brown fondant at the top for the grip, and then attaching some gray fondant at the bottom shaped like a club head.

I grouped cupcakes together to resemble a golf course.  Then I arranged the flags, golf balls, and clubs on the cupcakes.  I was going to make some holes in a few of the cupcakes, but as I started to try it I realized that it wasn't looking intentional and was going to be more of a headache than it was worth.
Andrea - Animated Name


(I created my animated name at this site.)


Thursday, March 8, 2012

Little Monster Cake Balls - September 2011

I was invited to participate as a guest blogger in a Halloween Event on Doodles and Doilies, but up to that point I had never made any Halloween goodies.  So, I decided to make these Little Monster cake balls for the event [and for us to eat later :)].

Halloween Little Monster Cake Balls 1

Halloween Little Monster Cake Balls - Close-Up View 1

Halloween Little Monster Cake Balls - Close-Up View Collage

These are just made using the basic cake ball recipe, then decorated various ways.  To make the actual cake ball I just followed the recipe found on Bakerella's website [yay, Bakerella :) ], which you can find here.  (You'll also find instructions and tips on coating them with the chocolate.)

Halloween Little Monster Cake Balls - Close-Up View 2

For these cake balls I actually used some extra cake and icing I had leftover from making a cake for my brother-in-law's birthday (see post Take Me Out to the Ball Game...).  To decorate them I used candy corn and pumpkins from the Brach's Autumn Mix, candy eyeballs from Wilton (so cute), chocolate almond bark (or you could use candy melts), and buttercream icing tinted various colors with food coloring.  I used toothpicks to make the mouths on my monsters.

Halloween Little Monster Cake Balls - Ingredients Collage
yum...

After you get your cake and icing all smushed up to a good consistency you'll want to roll and shape the cake balls.  Think about if you want all the monsters to be the same size or if you want some to be different sizes or a special shape.  (After you shape them you'll want to put them in the fridge for a few hours or you can speed things up by putting them in the freezer.)


Halloween Little Monster Cake Balls - Different Shaped Cake Balls Before They Were Decorated
Here are the different shaped cake balls that I made before they were decorated.

Now that they're ready you can let your imagination go and have fun decorating your monsters!

Halloween Little Monster Cake Balls - Angled View 1

For the chocolate covered monsters you can either have everything ready (candy corn, eyes, etc) to try to adhere to your monster before the chocolate sets or you can use a little of the melted chocolate to stick everything onto the hardened chocolate.  This time I did the latter, with a few exceptions.  For the monster with brown feet I put the candy corn in before it was dipped in the chocolate, and for the one with the yellow feet I stuck them in immediately after dipping it in the chocolate before it had a chance to harden.  The tall, gloppy, chocolate monster didn't get dipped, but instead I dripped the chocolate over it to give it... well... a drippy look.  :)  After I got the things stuck on I used a grass tip to pipe on any hair or fur.

Here is one of my family's favorites as it was made that had the chocolate covering on it.
Halloween Little Monster Cake Balls - Progression Shots of Chocolate Dipped Monster

Now if I were going to make these again I would add the mouths after I dipped them just before the chocolate was set instead of later in the decorating process, but if you forget or decide you want to add one later you shouldn't have a problem.

Halloween Little Monster Cake Balls - Close-Up View 3

For the monsters covered in buttercream icing I used my grass tip again to get that furry look.  When I started covering these monsters I picked the cake ball up and piped my icing around the bottom in a couple of rows first, then I set it down on the parchment paper to finish piping the rest of the fur on it.  The only exceptions to that were the monsters with the long fur that goes all the way down.  That was piped on from top to bottom in long strands.   You'll want to try to have your eyes and other decorations ready to put on before your icing sets so they stick, but also so it doesn't crack or crumble your icing when you push them into it.  Most of the candy corn I used whole, but for some monsters I experimented with cutting it depending on the look I wanted.  Make sure you let your icing set well before you pick up or move your monsters (you may even want to put them in the fridge to help it set some).  I found using a thin spatula to get under the monster and lift it up helped minimize damage from finger indentations, etc.

Here is one of my family's favorites as it was made that was covered using the buttercream icing.  I used a toothpick to shape the mouth before I put the teeth on.  The teeth, by the way, are tips of candy corn cut in half.  :)
Halloween Little Monster Cake Balls - Progression Shots of Buttercream Piped Monster
My son nicknamed this one Tricker-Treater Pumpkin Eater!  :)

I would imagine these would work as cake pops too (I've not yet made any cake pops).  You may just have to watch the size some since these tend to be a bit heavy, you'd want to make sure they stay on the stick.  (You can also find instructions for cake pops on Bakerella's site here.)

Halloween Little Monster Cake Balls - Overhead View

Halloween Little Monster Cake Balls - Individual Close-Up View Collage 1
All kinds of happy little monsters!  :)  Is that a one-eyed, one-horned, flying purple people eater?... I think it would be the one getting eaten though.  :)

Halloween Little Monster Cake Balls - Individual Close-Up View Collage 2
The top one above kind of reminded us of a turkey, the kids called the middle one Yoda, and then there's my nod to a cute two headed monster I used to watch on Sesame Street.  :)

Halloween Little Monster Cake Balls - Individual Close-Up View Collage 3

If you're like me, you may find it helpful to sketch out some monsters before you start to get an idea of what you want them to look like and to know what you'll need to make them.  It's by no means necessary though, some people work better being spontaneous.  :)

Halloween Little Monster Cake Balls - Angled View 2
To make our little pumpkin patch I used some crumbled cookies for dirt and some of the pumpkins from the Brach's mix.  It made a great place for our monsters to hang out.  :)

Halloween Little Monster Cake Balls - Angled View 3
Some artificial fall leaves give it a nice touch too.

Halloween Little Monster Cake Balls - Individual Close-Up Angled View Collage

Halloween Little Monster Cake Balls 2

I had a lot of fun making these little monsters and thought they turned out really cute!  We all had a good time eating them up too!  :)
Andrea - Animated Name
(I created my animated name at this site.)
 
 
Parties I've linked this post to:
Creative Bloggers' Party and Hop - Homemaker on a Dime
Made by You Monday - Skip to My Lou
Just Something I Whipped Up - The Girl Creative
Tuesday To Do - The Blackberry Vine
Whatever Goes Wednesday - Someday Crafts
What I Whipped Up Wednesday - Sugar and Dots
Strut Your Stuff - Somewhat Simple
Sweet Treats & Swanky Stuff Thursday - Something Swanky
Kitchen Fun and Crafty Friday - Kitchen Fun with My Three Sons
For the Kids Friday - Sun Scholars
Show Me What You Got - Our Delightful Home
Halloween Categorically Crafting - Someday Crafts

Tuesday, March 6, 2012

Take Me Out to the Ball Game... - September 2011

I made this baseball themed cake for my brother-in-law, Brad's, birthday.

3D Baseball Themed Cake

3D Baseball Themed Cake - Side View 1

3D Baseball Themed Cake - Back View

3D Baseball Themed Cake - Side View 2
More pictures and details to come... :)

[Right now I'm just trying to get everything on the blog, then I'll go back and fill in details; you can read a little longer explanation here if you want. BUT if you have any questions in the meantime, in general or about this cake, please feel free to email me by clicking on the 'Contact Me' tab at the top of the page and using the email address found there, and I will try to get back with you as soon as possible. Or you can always ask questions or leave a comment about this cake by clicking the comments link at the end of this post.   :)]
Andrea - Animated Name
(I created my animated name at this site.)

LinkWithin

Related Posts Plugin for WordPress, Blogger...